DIY Guide: How to Replace Your iPhone 15 Pro Max Screen

iPhone 15 Pro Max Screen Repair: Your Complete DIY Guide
A cracked iPhone screen is a common problem, but the solution doesn't have to be expensive or wasteful. Replacing the screen on your iPhone 15 Pro Max is a challenging but rewarding project. With the right tools and a high-quality replacement part, you can restore your device to its original glory. At Micro Wire, we champion the circular economy: repair, don't replace. This guide will walk you through every step, empowering you to make a smart, sustainable choice.
Important: A Note on Safety and Warranty
This is an advanced repair. Proceed with caution. Disconnecting the battery is crucial to avoid short circuits. Performing this repair may void your manufacturer's warranty. Micro Wire is not responsible for any damage caused during your repair attempt.
Tools and Components Needed
Having the right equipment is half the battle. We've compiled a list of essentials, all available in our store, to ensure a smooth repair process.
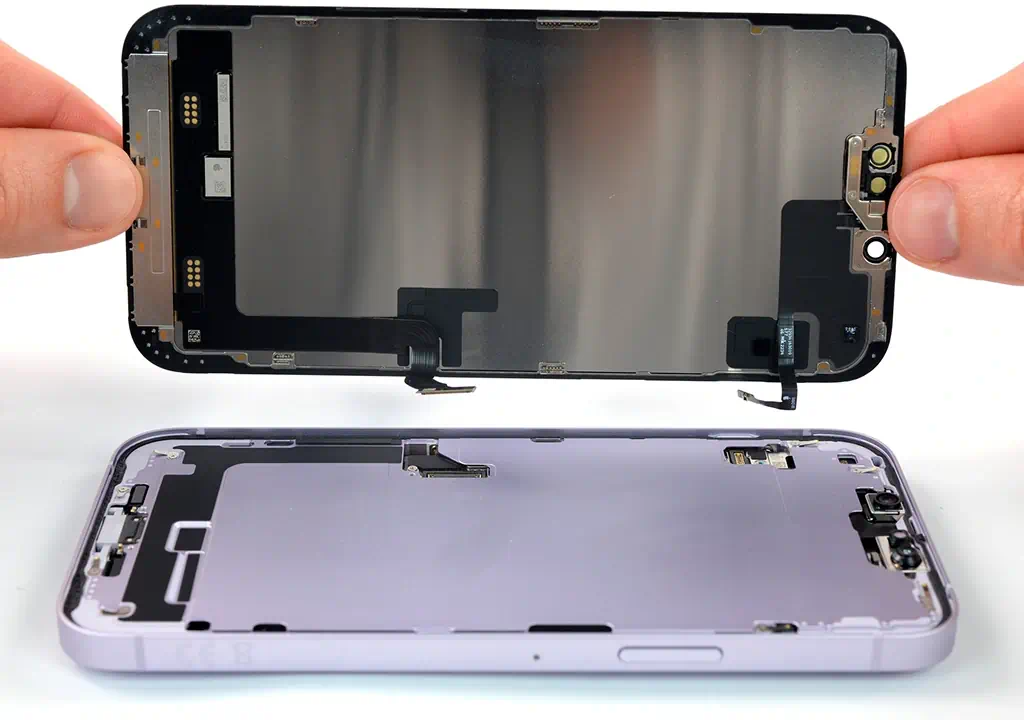
iPhone 15 Pro Max Screen
The centerpiece of your repair. Our Soft OLED screen ensures vibrant colors and perfect touch response.
Repair Kit
Includes all necessary drivers (Pentalobe P2, Tri-point Y000), spudgers, and opening picks for a safe disassembly.
iOpener or Heat Gun
Essential for softening the adhesive that seals the screen to the frame, allowing for a gentle opening.
Step-by-Step Replacement Guide
Step 1: Power Down and Remove Screws
Always start by completely turning off your iPhone. Then, using the Pentalobe P2 screwdriver, remove the two screws located on either side of the charging port.
Step 2: Soften the Adhesive
Gently heat the bottom edge of the iPhone with a heat gun or an iOpener. This will soften the waterproof adhesive, making it easier to pry the screen open without causing damage.
Step 3: Open the Display
Apply a suction cup to the bottom of the screen. Pull up gently to create a small gap, then insert an opening pick. Slide the pick along the edges to slice through the adhesive. Open the display from right to left, like a book.
Step 4: Disconnect Battery and Screen
Once open, locate the metal cover over the battery and display connectors. Remove the screws holding it in place. Using a plastic pry tool, carefully disconnect the battery connector first. Then, disconnect the two display connectors.
Step 5: Install the New Screen
Connect the new screen. Reconnect the battery connector last. Before sealing the device, power it on to test the new display's functionality, including touch response and colors.
Step 6: Seal and Reassemble
If everything works, power off the phone and disconnect the battery again for safety. Apply a new waterproof adhesive seal (if desired), position the screen correctly, and gently press it into place. Re-install the two Pentalobe screws at the bottom.
Congratulations, You're a Repair Hero!
You've successfully replaced your screen, saving money and reducing e-waste. This is the core of the circular economy, and we're proud to support your efforts. For more parts, tools, and guides, explore Micro Wire and join the repair revolution!